
Want to Save Fabric? Use a Marker
When I say marker hopefully your mind doesn’t go straight for the colorful kind. Well, ok, maybe at first but then it’s time to get back to business and stop daydreaming about coloring.
Let’s say You are wrapping up your fit approvals, finalizing the details and ready to hand off your pattern to the grader. Maybe you have opted for a printout of the separate sizes and you plan to cut garments as you have an order for a specific size. But what happens when you get a bunch of orders for your new styles you are launching. That’s going to be a lot of garments to cut!
If you find yourself in this position, then you need a marker. A marker is essentially the longest sheet of really wide paper you can imagine where each piece of your pattern, for every size , is laid out in a way that optimizes your fabric so very little goes to waste.
We all know fabric is expensive, so don’t waste it!
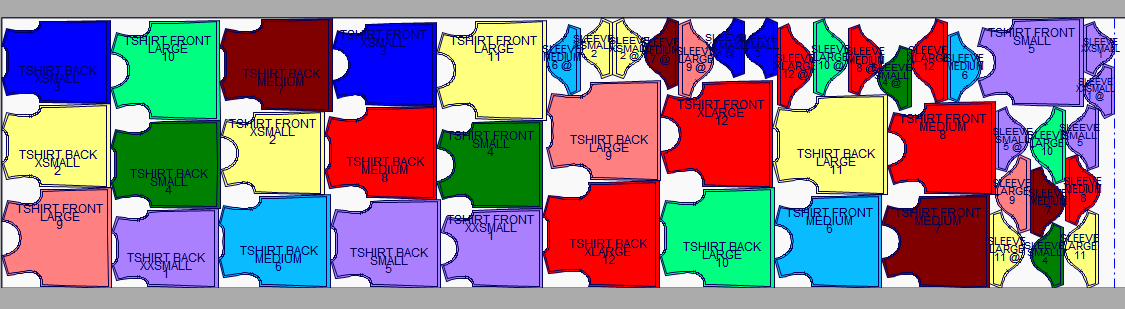
Here is what a basic marker for a simple tshirt can look like.
What you need to get a marker made
The most important component of the marker making process is the digital graded file. In the old days, markers were done by hand. So it can absolutely be made using hard copy printouts. However, just like pattern grading- using the right software and having someone who knows how to get things done quickly, can save you a lot.
Your graded file will need to be a two-parter. It must contain the .DXF and the .RUL. Without the .RUL file the grading will not show up.
For each fabric you are using you will need a marker made. For instance, the front of your t-shirt is a print, but the back and the sleeves are a solid color. This means you will need two markers made.
Along with your graded file, you will need to provide your marker maker with the following information:
1) Cuttable width of your fabric.
The cuttable width is a different number than the fabric width that the supplier will provide. The cuttable width subtracts the selvedge, aka the bumpy dots on the edge of the fabric because you don’t want this included on a garment.
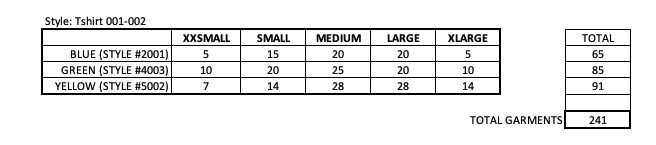
2) Number of pieces you want for each size
The best way to communicate this information is with a cutting ticket that specifies what sizes are being ordered and how many for each size and color.
Here’s an example of a very simple cutting ticket:
3) Special directions based on your particular fabric characteristics.
The main question your marker maker will want to know is if they can cut garments going both up and down. This helps to optimize the marker, but sometimes different fabrics will look differently depending on which way it is orientated. Just be aware of this.
It’s also good to communicate stripe widths, print repeats, and any special placments that need to happen.
After the marker is made
The marker is delivered to the cutter or the factory (or maybe they printed it out themselves). The cutter will look over the cutting ticket and marker notes and spread the fabric across a very long table. But generally, this is not a single layer, it is multiple layers precisely stacked on one top of each other. The math has been done to calculate how many layers (plys) need to be spread to equal the amount of pieces needed.
The printout of the marker is spread over top of the stacked fabric layers to be used as a guideline for how to cut.
Want to see how a marker is cut? Here’s a link to a video.
Commonly asked Marker Questions:
Can you reuse markers?
If you only have one copy the easy answer is no. It’s going to get cut up along with the yardage.
Can you just have a new set printed? Yes, but it has to be the same size and color breakdowns as per the original cutting ticket otherwise you will need new markers.
What is the process of requesting a marker?
First off, check with your factory. Do they want you to provide a marker working with a third party, or will they make their own?
Second, set up a cutting ticket and pass to your marker maker.
Provide the cuttable width and any special cutting directions needed.
If the marker is being made by somone who is not doing the cutting, ask your marker maker to provide screenshots and total length of the proposed marker that you can share with your factory.
Now, not everyone will agree with this step, but you can only cut fabric once so you want to make sure it is right. Not everyone has the same setup. Some cutters have super long tables 20 yards long. Others will have one just long enough to fit their space, maybe 10 yards. Based on their limitations they know what kind of length they can accommodate. Also, if they look at the proposed layout and think it is not workable for them, this is their opportunity to say so.
Once everyone is in agreement markers are printed and shipped out.
My factory suggests I cut more pieces so I don’t waste fabric. Does this sound right?
Sometimes it’s better to have a few extra garments made up that you can try to sell instead of throwing away that extra fabric that would go into the garbage as scrap.
When a marker is generated digitally it may not be obvious that there is a huge gap in fabric that can be saved. However, if your marker maker is playing around with different combinations of quantities, sometimes this ends up saving fabric.
But I don’t do big production runs. Does using a marker still apply to me?
If you are cutting even 3 pieces all the same size of 2 styles that share the same fabric, it can be in your interest to create a marker. This will speed up the cutting time and save on fabric. This is the best way to get pre-production samples made. It may not always be cost effective, but it creates a convenience for a sample room to help them expedite for you.
Markers can save you so much time and fabric. You may think that you are not there yet for your business. I get it. You don’t necessarily need to pay someone to set this up. With some extra wide paper you can do the leg work yourself to get your samples made applying the same principles outlined above.